Thursday, July 26, 2012
Queen Anne's Little Lace Gloves
I was looking to make a pair of fingerless gloves that would cover a lot of ground without using up too much yarn, and happened to have a Queen Anne's Lace Scarf lying right next to me. I wrapped it about my hand, examined it closely, then jotted down this pattern. It took a little bit of trial and error to get it just right, and I tried to add a lace trim over the wrist, but after several rounds of failure, I realized the gloves looked best with no trim at all.
I've found the best way to go up and down in size, is to go up and down in hook size. Making this glove with an H hook was too big for my hands, but trying it again with a G made it just right. Using a ruler, my hand is about 3 inches across. If yours is bigger, then an H or I hook might be better for you.
Gauge:
With a G hook, 1st motif's diameter was 2.5 inches.
With an H hook, 1st motif's diameter was 3 inches.
For the first four motifs, we follow the Queen Anne's Lace pattern exactly. That is:
1st motif:
ch 6, sl st to join.
ch 3, 13 more dc into the ring, do not join, turn.
sc into the first 2 dc, *ch4, sc into next 2 dc (Picot made), repeat from * to the end (Which includes a sc into the beginning chain). ch 6, turn
2nd motif:
sl st into the first picot, ch3, turn.
13 dc into the ch6 loop. Sl st to the sc on the end of the 1st motif, ch1, turn.
sc into the first 2 dc, *ch4, sc into next 2 dc, repeat from * to end. ch6, turn.
3rd motif:
sl st into first picot, ch3, turn.
13 dc into the ch6 loop. sl st into the nearest free picot, ch1, turn.
sc into first 2 dc, *ch4, sc into next 2 dc, repeat from * to end. sl st into nearest free picot, ch6, turn.
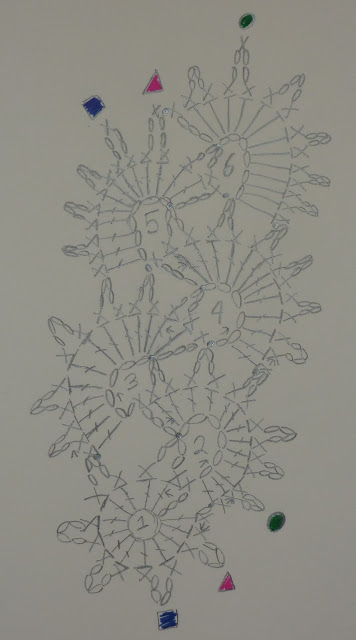
Repeat instructions for the 3rd motif for the 4th, and to begin the 5th. On the 5th motif's outer most row (The sc and ch4 picots) do this, instead:
After 3 picots have been made, the 4th picot will be ch 2, sc in 1st motif’s 2nd picot, ch 2, sc into 5th motif as normal. That will be the 4th picot. On the 5th picot, ch 2, sc in 1st motif’s 1st picot, ch2, sc in fifth motif as normal. Continue to end, then continue on into 6th motif as per Queen Anne's Lace instructions (ch6, 14 dc in loop, etc).
On the sixth motif’s outer most row, after 4 picots have been made, the 5th picot will be ch 2, sc in 2nd motif’s closest picot, ch 2, continue on 6th motif as normal to the end. Slip stitch into the fifth motif’s closest picot, as you would in the normal pattern (It is already connected to another picot, as well). Finish off, weave in end.
For second glove, follow the same pattern, then fold it inside-out.
I do not have fancy charting software, so I drew a chart as best I can, and color-coded the picots that should be connected at the end. I hope it helps this make sense!
Subscribe to:
Post Comments (Atom)


wow! its so pretty!!!
ReplyDeleteits really pretty!!! just wondering, can i sell this pattern?
ReplyDeleteIt's never right to sell someone elses pattern MoonToon. I hope you didn't do it. Thank you for this pattern. You are very talented!
ReplyDelete